Shopify App
Arvo Custom Product Forms for Shopify
✓ Available on Shopify App Store
✦ No-Code Builder
🛍 Works on Every Plan
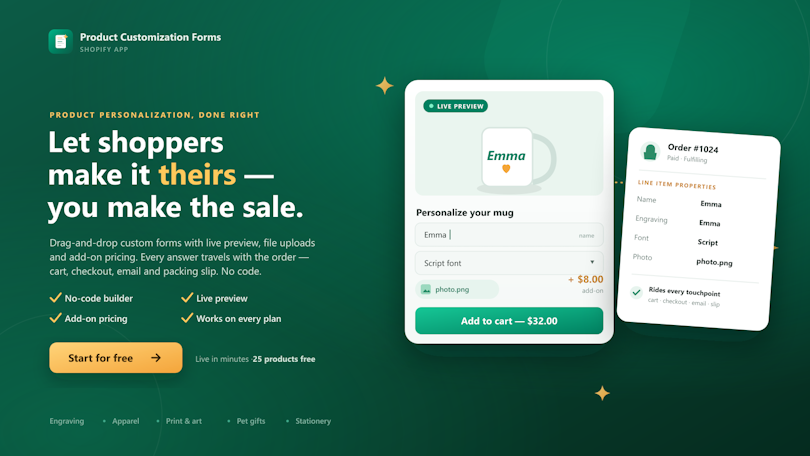
Most stores handle personalization with the order notes box. A customer buying an engraved ring types "Sarah, June 12" into a field built for delivery instructions, and someone in packing has to spot it. On a slow Tuesday they will. In December they won't, and the ring ships blank.
Uploads go wrong differently. The shopper drops their logo into a widget, the file lands in that widget's storage, and the order reaches the print bench with no artwork attached to it. Somebody then matches file to order by name or email. That works fine until you're doing forty a day.
The third problem is the theme. Personalization usually means editing product.liquid or pasting an embed into theme code, and both of those come apart when the theme updates. You don't find out at the time. You find out when an order arrives empty.
Arvo takes a different route on all three. Each answer is written as a line-item property on the cart line, the same field Shopify uses for variant details, so it lives inside the order instead of in a separate system you reconcile by hand. And it goes onto the product page as a theme app block rather than a code edit, so a theme update leaves it alone.
Seven screens in the order you'll meet them, from install to a finished order.
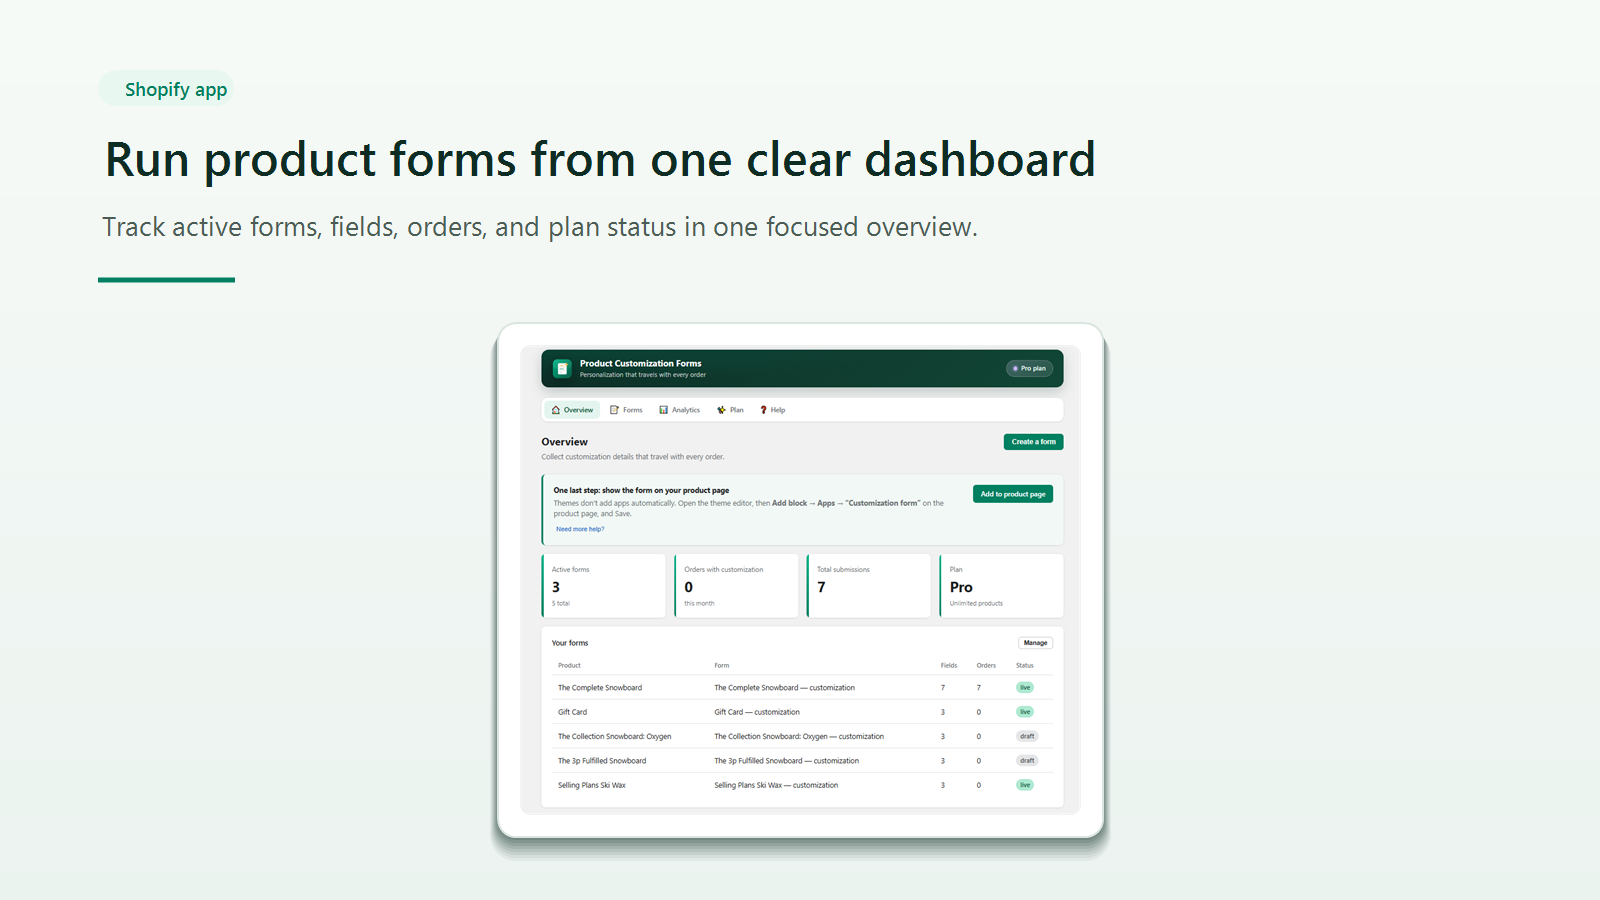
This is the first screen after install, and the banner across the top is the part people skip. Shopify themes don't add app blocks by themselves, so you open the theme editor, click Add block, choose Apps, and put the Customization Form onto your product template. Until that's done, the form exists in your account and nowhere else.
The four counters underneath tell you where things stand: active forms against total forms, how many orders this month actually carried a customization, total submissions, and your plan. The table below lists every product with a form on it, how many fields that form asks for, how many orders it has produced, and whether it's live or still a draft.
That combination is useful for one specific reason. If a form says live and the storefront still looks untouched, you know the block never made it onto that product's template, and you can go fix it in about a minute.
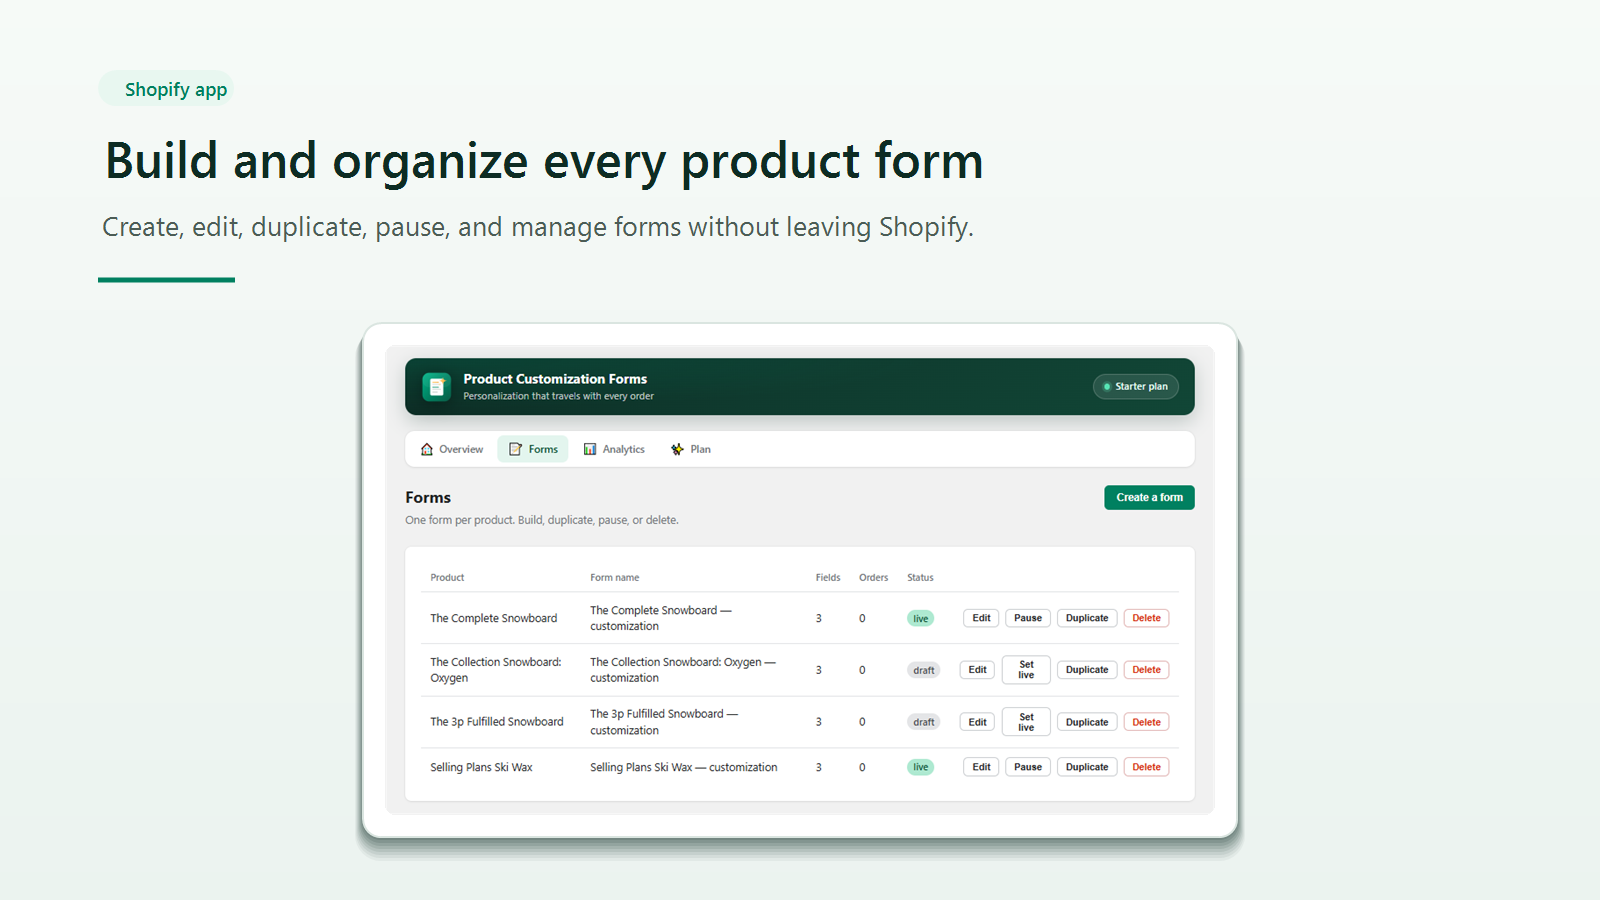
One row per product, with the buttons you'll actually use sitting on the right of each row. Edit the fields, flip a draft live, pause a live form back to draft, duplicate it, delete it.
Pause is the one worth knowing about. It takes the form off the product page without destroying the configuration, which is what you want when a product goes out of stock for a month and you'd rather not collect engraving text for something you can't ship.
Arvo builds one form per product rather than one form for the whole store. That's good news if you sell rings and t-shirts and need them asking completely different questions. It's less good if you sell three hundred variations of the same engraved item, because then a change to the field list is a change you make three hundred times, or duplicate three hundred times.
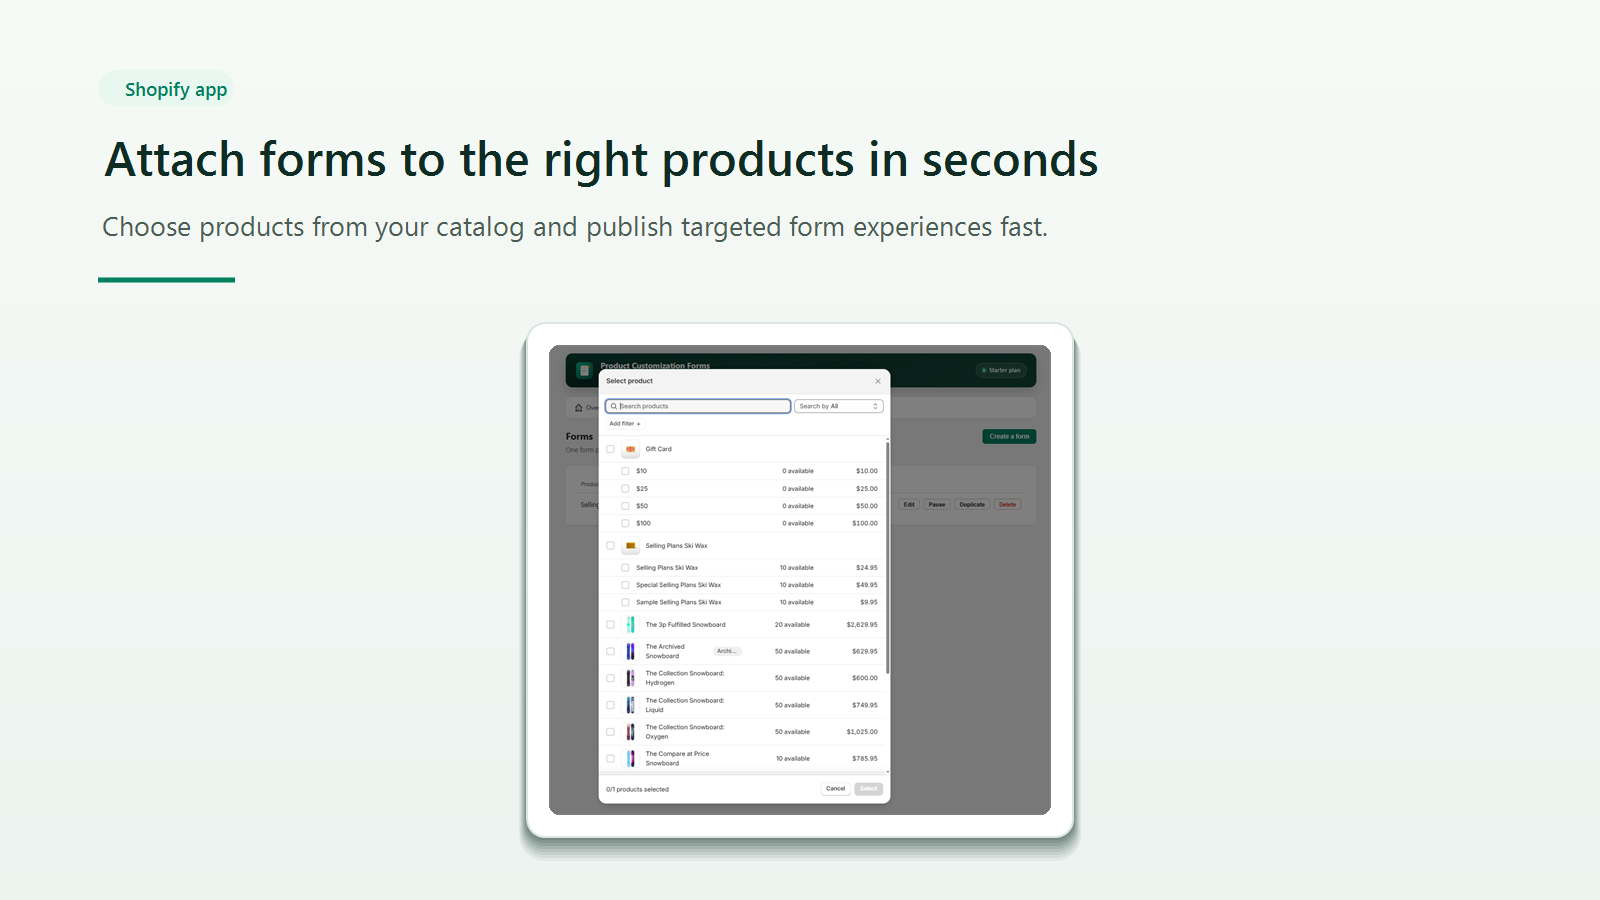
Attaching a form starts here. It's a searchable list of your catalog with each variant's price and stock count printed in the row, which saves opening another tab to check you're modifying the right SKU.
Forms are one per product, so the picker holds you to a single selection and counts it in the footer until you commit. The stock numbers deserve a glance while you're here. A variant reading 0 available is one where a live customization form just collects engraving instructions for something nobody can buy yet.
Hit Select and you land in the builder for that product, empty and ready for fields.
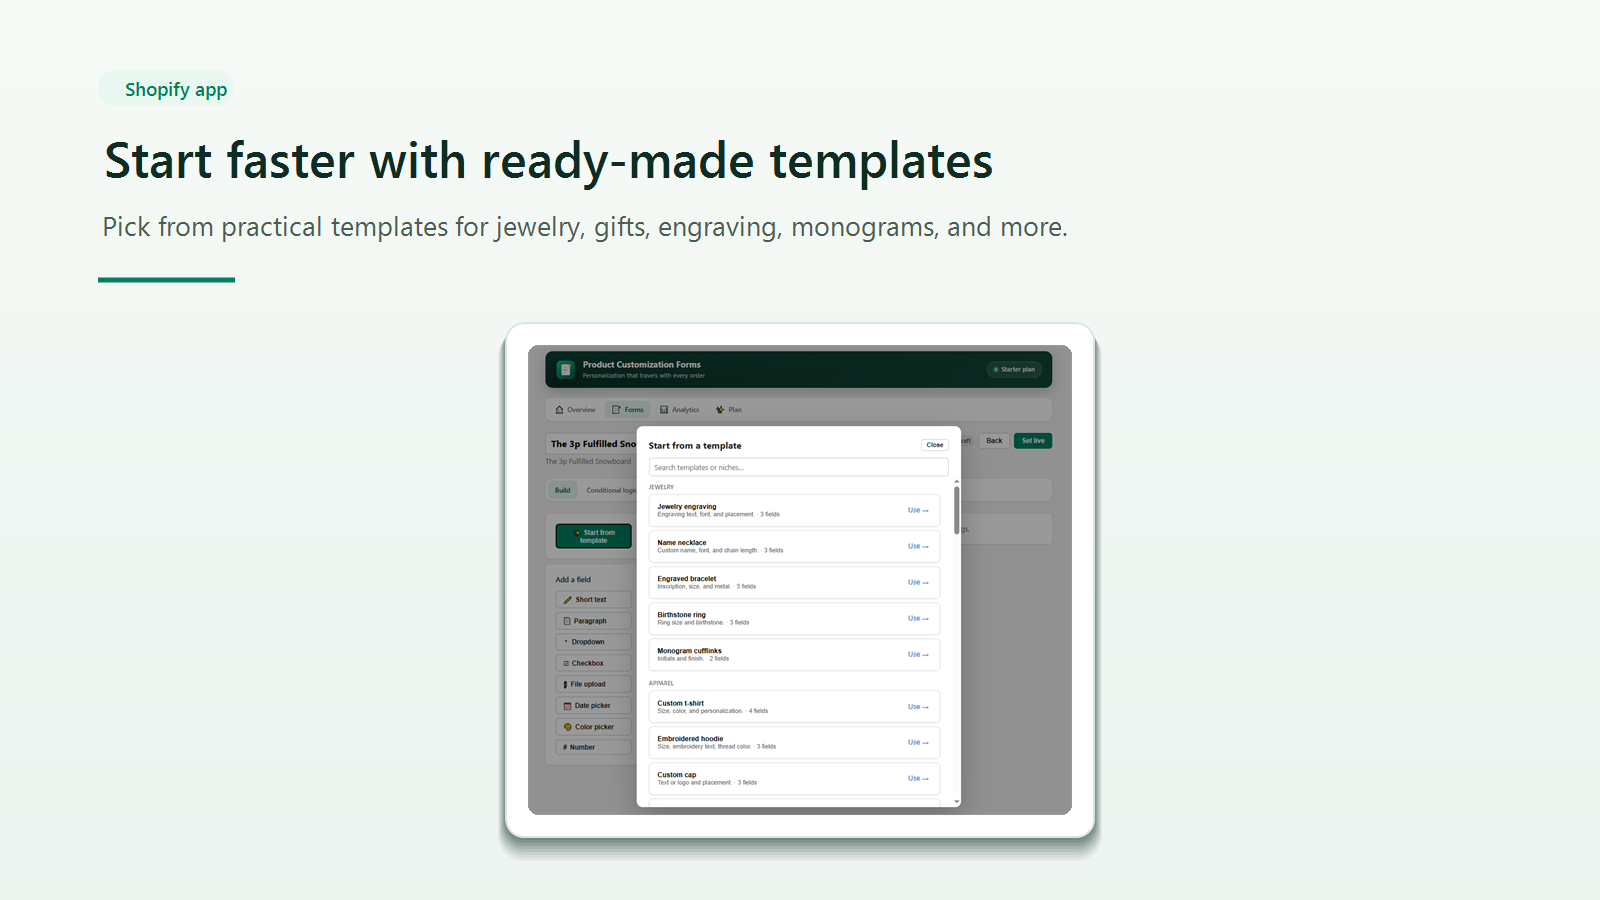
You can build a form from scratch or start from one of these. The library is grouped by category, jewelry and apparel and so on, and each entry says what it contains before you commit. Jewelry engraving comes with three fields for text, font and placement. A custom t-shirt comes with four.
Clicking Use drops that field set into the builder already labeled. From there it behaves like any other form, so rename fields, reorder them, delete what you don't want, add your own.
Mostly this is a time thing. If you've never built a personalization form before, the templates encode a sensible structure for the common cases and you edit from there instead of guessing. Paid plans get the full library of 50 plus. The free plan gets 10.
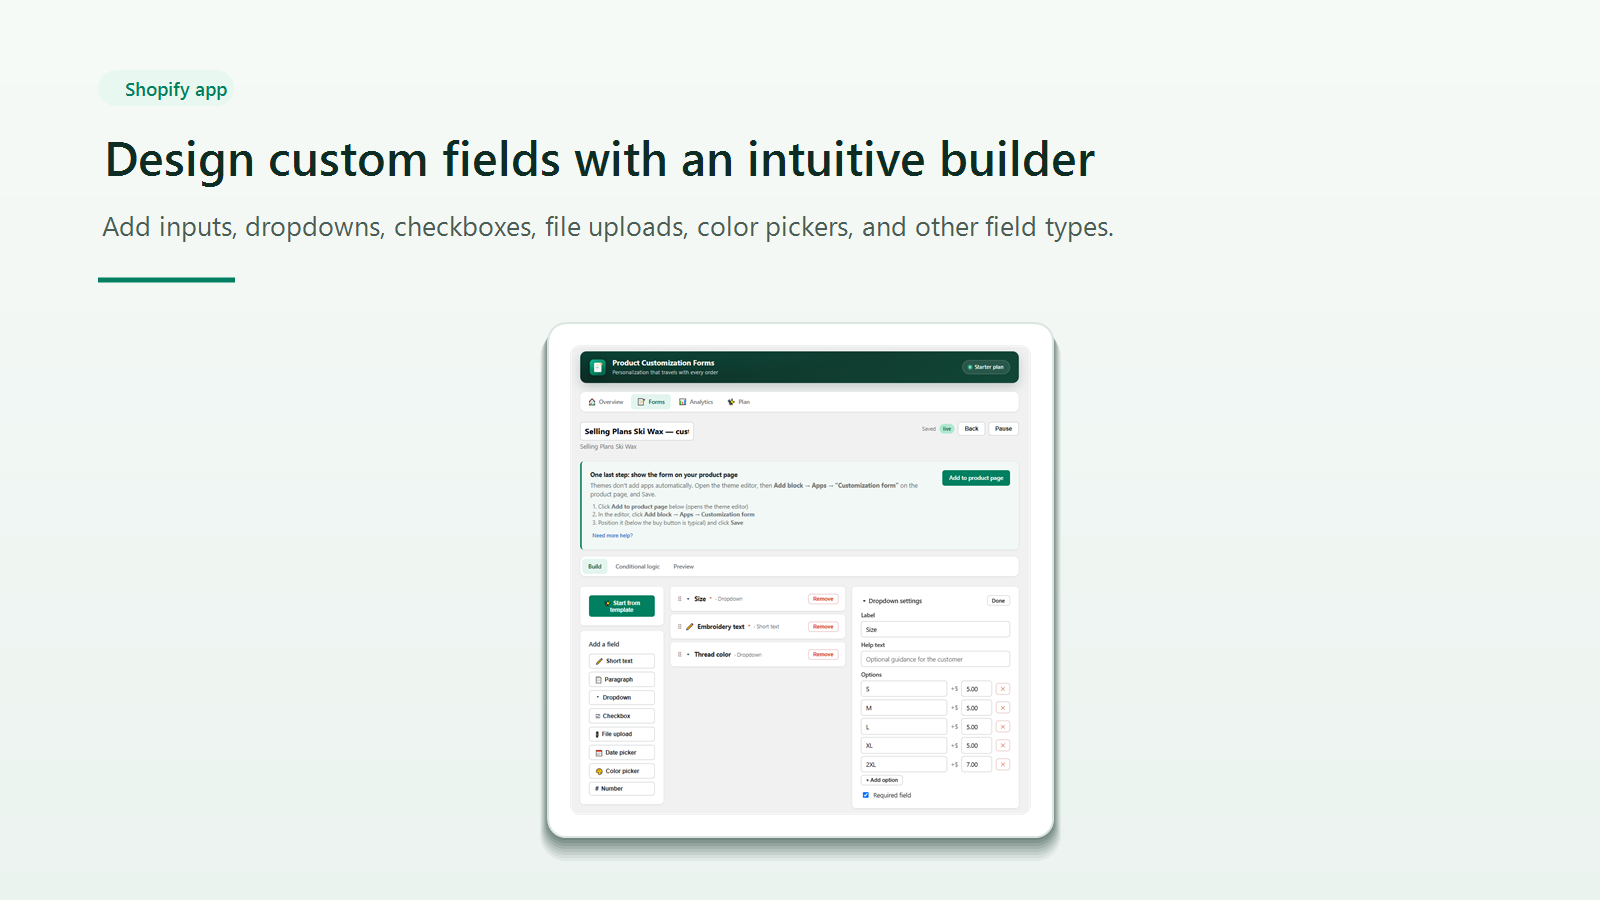
This is the field editor and the place add-on pricing gets set. Field types sit in the left column: short text, paragraph, dropdown, checkbox, file upload, date picker, color picker, number. Click one and it drops into the middle column. The order in the middle column is the order shoppers see.
Select a field and its settings open on the right. Label, help text, and for a dropdown, the list of options with a price against each one. In this screenshot the Size dropdown adds nothing for S through XL and $7.00 for 2XL. That surcharge shows in the shopper's running total and carries through to the order as its own priced line rather than disappearing into the base price.
Each field has a Required checkbox. Turn it on for anything fulfilment genuinely cannot proceed without, like the engraving line itself. Leave it off for the rest, because a required field the shopper doesn't understand is a required field that loses the sale.
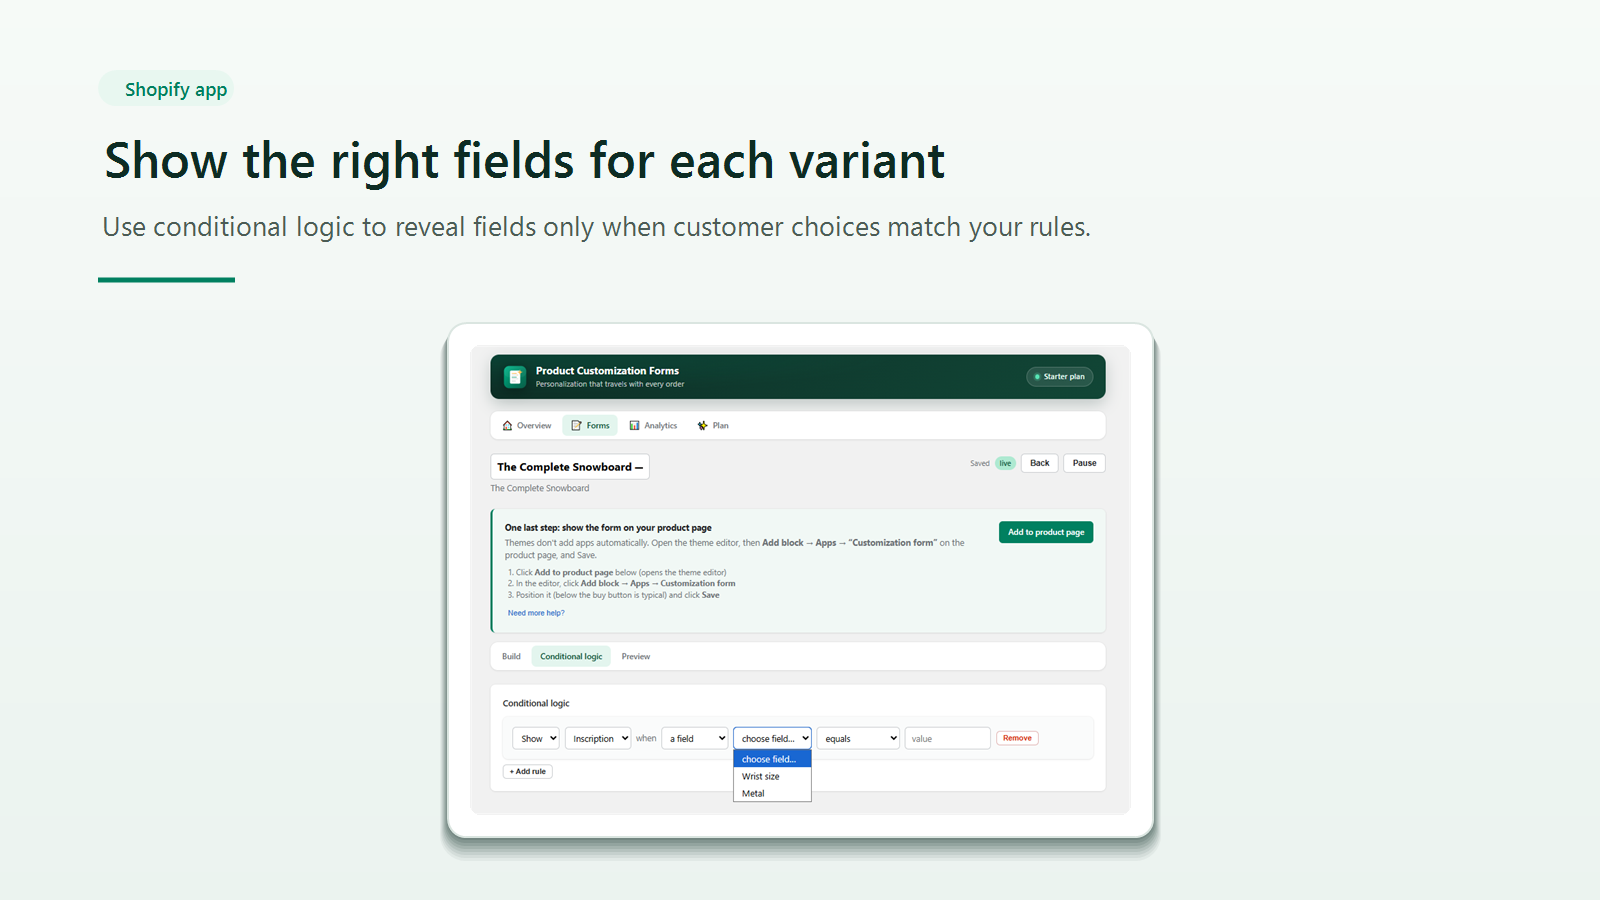
Conditional logic stops the form asking everyone everything. Every rule reads the same way: show this field when that field equals this value. In the screenshot the rule is set to show Inscription, with the dropdown open on the form's other fields, Wrist size and Metal.
Stack a few rules and one form covers a whole product. Someone who picks the plain band never sees an engraving box. Someone who picks the engravable band watches it appear as soon as they select it.
Two things to know. Rules run in the order you add them, so a form carrying a lot of overlapping conditions can produce combinations you didn't picture. And the only way to check that is the Preview tab, which is the next screen along.
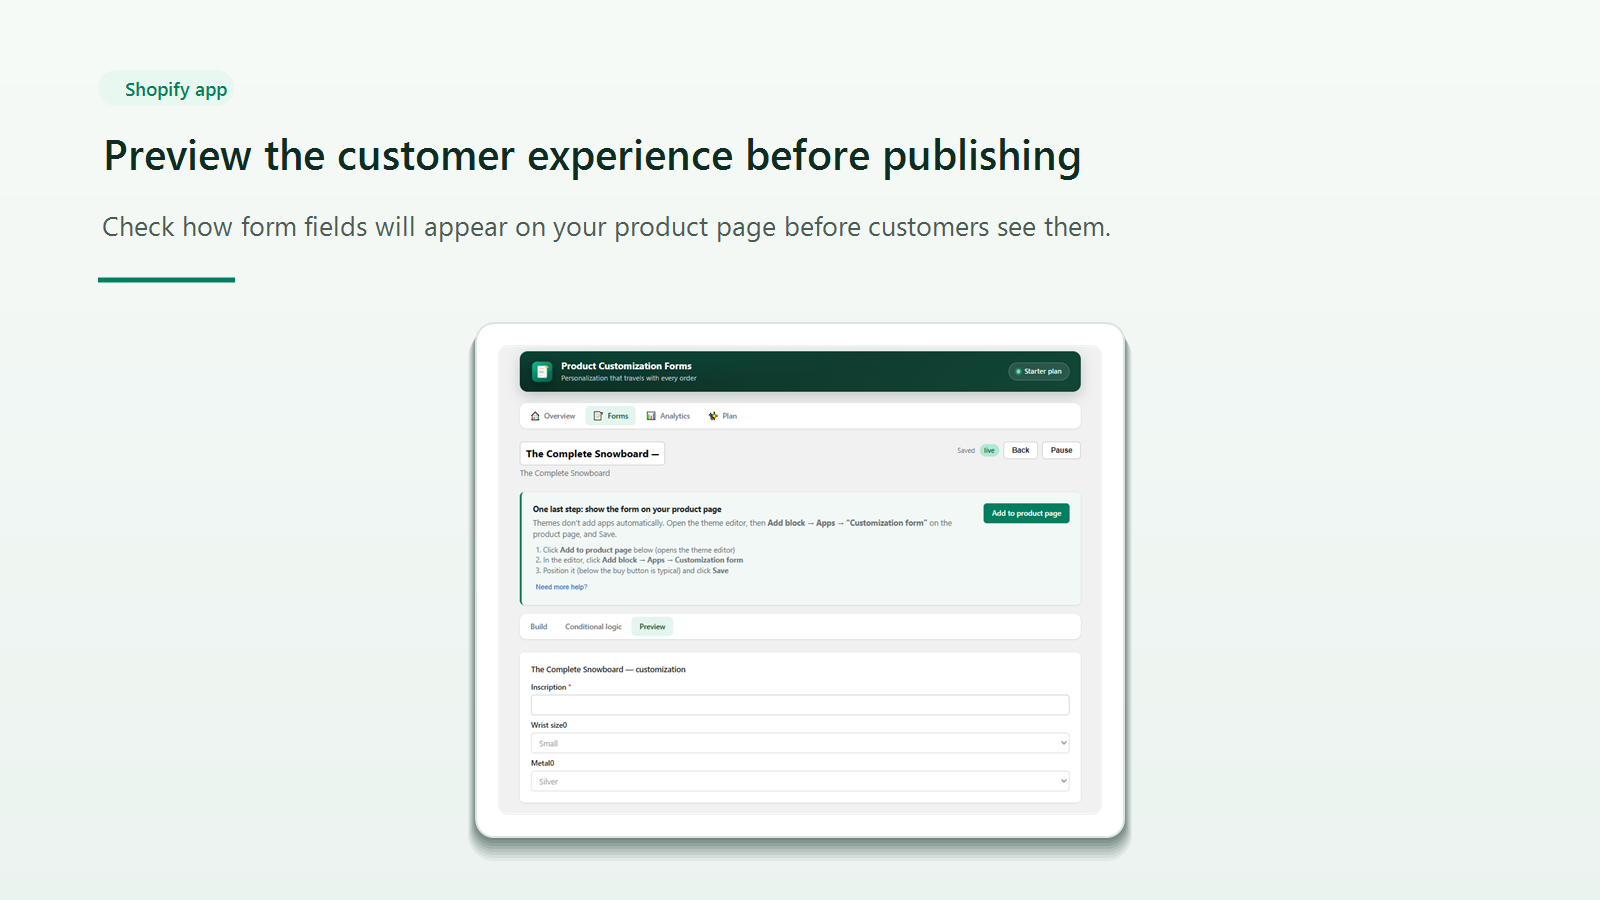
Preview draws the form the way a shopper gets it, using your real fields and your real rules rather than a generic sample. The Complete Snowboard here shows a required Inscription box and two dropdowns sitting at their defaults, Small and Silver.
It's here to catch the gap between what you built and what somebody actually meets on the page. Field order, defaults, which fields your conditions are currently hiding, and whether a required field is going to stop someone checking out.
Check it after every change to conditional logic in particular. A rule can look right in the rule builder and still hide the wrong thing once it runs against real defaults. There's no staging store here, so this tab is the closest thing to a rehearsal before the form starts taking real orders.
Every answer is written as a line-item property on the cart line. That's the native Shopify field, the one variant details already use, so the data belongs to the order rather than to Arvo. Properties appear in the cart, at checkout, on the confirmation email, on the order page in your admin, and on the packing slip if your packing slip template prints line-item properties. Shopify's default template does. One detail worth having: any property whose name starts with an underscore stays hidden from customer-facing pages but visible in the admin, which is the standard Shopify trick for internal fulfilment notes you don't want repeated back to the buyer.
File upload isn't on the free plan at all. Starter allows 5 files per field at 10MB each. Pro raises that to 20 files at 50MB each. Where those files live afterwards isn't stated in the App Store listing, and neither is how long they're kept. If you engrave or print and you need a customer's original artwork three weeks after the order shipped, ask the developer before you build a process around it. This is the kind of detail that only becomes a problem at the exact moment you need it.
Arvo goes onto the product page as a theme app block, the Online Store 2.0 mechanism, added once through Add block and then Apps in the theme editor. Since it isn't a code edit, an update to your current theme leaves it in place. Switching themes is a different story. App blocks are placed per template and don't travel, so a new theme means adding the block again, and so does replacing the product template. Vintage themes from before Online Store 2.0 don't support app blocks, so if that's what you're running, this isn't a fit without manual template work.
The listing doesn't say how Arvo behaves with Shopify Markets, draft orders, or subscription selling plans, and guessing on your behalf wouldn't help you. What can be said is that line-item properties are core Shopify plumbing that those features generally handle. What isn't written down is the specific part: how an add-on price converts across Markets currencies, and whether a personalization answer follows a subscription into its second and third orders. If you run any of the three, test it on one product before rolling it out.
Add-on pricing runs through Shopify's Cart Transform Functions, which is Shopify's supported way to adjust what a cart line costs without touching the product's own price. Here's the part that deserves a test. Because the add-on is applied as a cart-level adjustment, a percentage discount code worked out against the original line price may not recalculate the way you'd expect against the adjusted total. The developer doesn't document it either way. If discount codes are a big part of how you sell, run one through before launch. Tax behaves normally, calculated on the resulting line total under your store's usual settings, the same as any other line item.
Taken straight from the Shopify App Store listing. All charges in USD, billed every 30 days.
$0 / month
$9.99 / month
$19.99 / month
One form per product is the big one. There's no shared field structure you edit once and push everywhere, so a catalog of 300 near identical engraved items means 300 form configurations to keep in step, or 300 duplicates of one template. For a few dozen products that's nothing. For a large catalog built on one repeated pattern it's ongoing work that never quite ends.
The free plan stops at 25 products and has no file upload. Upload starts on Starter at $9.99 a month. If customers need to send you artwork from day one, plan on Starter and skip the free tier.
Add-on pricing goes through Cart Transform Functions, and how that lands with percentage discount codes isn't documented anywhere. Test it if codes matter to your store.
It suits engraving, jewelry, apparel, pet gifts, stationery, signage and custom furniture. Products where personalization is a handful of fields per item. It suits you less if you need one master configuration governing thousands of products, or if you need confirmed behaviour with Markets, subscriptions or draft orders before you can launch, because none of that is written down yet.
Shopify's own variants. If your personalization is really a fixed set of choices, four colors and three sizes, use variants. They're free, they're built in, and no app is involved. Where variants stop is free text and file uploads. Shopify doesn't offer either natively, and that gap is the whole reason apps like this exist.
The established options apps. Several apps in this category have been around far longer than Arvo and carry far more reviews. They tend to cover more field types and more complex pricing rules, and they tend to cost more and take longer to set up. If you need pricing logic more involved than a flat amount per option, look at those first. And if you're already on one that works, switching costs you time you may not get back.
Order notes and a free text field. Free, no app, no setup, and exactly the failure mode described at the top of this page. If your volume is low enough that somebody reliably reads every note before it ships, you probably don't need a forms app yet. The month that stops being true is the month one starts paying for itself.
Nothing. Answers are written onto the order as line-item properties at the moment the order is placed, and Shopify keeps them as part of the order record, not Arvo. Uninstalling stops new forms rendering on your product pages. It does not touch orders you have already taken.
It renders through a theme app block rather than an iframe or an injected script, which is the lighter of the two approaches. That said, the developer has not published load time numbers, so if speed is a live concern on your store, test it on your own theme rather than taking anyone's word for it.
The listing does not say whether submissions can be exported beyond what already sits on the order in Shopify Admin. Worth asking the developer before you build reporting around it.
The file is something your customer made for your order. What the listing does not cover is where uploads are stored or how long they stay there. If you engrave or print, and you might need that original file weeks later, ask first.
Not documented. If you have live forms sitting above the lower plan's product limit, ask support what happens to them before you downgrade rather than after.
The listing does not say.
Install Arvo and publish your first form in a few minutes. There's a free plan, no code and no credit card.
Free plan available · 25 products free · Live in minutes